Showing posts with label tutorial. Show all posts

3.25.2013

Seed Starting


This is the 1st time I've ever started seeds for a garden and I decided to share my process with you.


I had saved egg cartons as they were emptied and cut of the top and side pieces off with scissors. Also, I saved children's yogurt cups. 


The first step is to make drainage holes. I used a paring knife and cut x's on the bottom. On the bottom of the yogurt cups, it was more difficult, so I was happy with just one cut. 


See? Perfect for drainage.


Take your potting soil and lightly fill your egg carton.


Then, using your finger make a hole the recommended depth on the back of your seed packet in each section. 


Then take your seed, drop one in each hole, cover with more dirt, and pack lightly. 


Before you water your seeds, make sure you have a spot to put the egg carton on without it draining all over your counter/windowsill. I used a 9x13 baking dish, the lid for the 9x13 dish, even my nice white platter. Then I placed them on my kitchen bar to keep them safe from my inquisitive 2 year old. I would trust my 7 and 4 1/2 year old them, though. 

I've had so much fun planning for our garden. I'm hoping to be a better gardener this year. Also, I would love to have more space to grow, especially to have my own strawberry patch. We've all had fun watching the seedlings grow. In just the past couple of days we have been watching the seedlings grow inches and inches. I'll show you how much they've grown soon!

10.09.2012

Large Dreamcatcher Tutorial

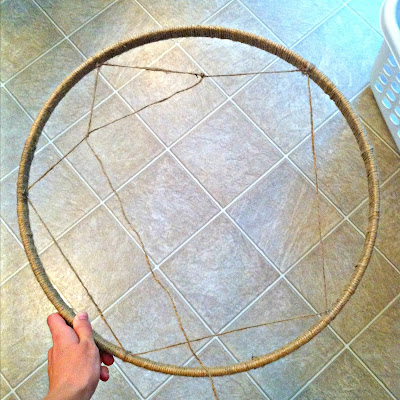
I wanted to make an extra large dream catcher and so I started out with the inside circle of a large embroidery hoop.


and some basic twine from any home improvement store.


Then wrap the embroidery hoop with twine, hot glueing along the way to keep the twine tight. 


Be forewarned, it takes quite awhile to get all the way around the hoop.


Also, try to make sure that you'll have enough twine of the same brand to wrap the whole way around the hoop or you might have to deal with different shades of the twine.

Like me:


Then take the twine and tie it at random intervals around the hoop and then keep going around in levels, continuing tying the twine until you get to the center. Tie your final knot and cut the twine.


I ended up with a nice star design.


I think the tiny star in the center is particularly fun.


Don't forget to loop your twine at whatever spot you want to have as the top of your dream catcher. I secured it by hot glueing the twine around the hoop, then making a loop, hot glueing that, and then hot glueing the twine around the hoop once more.


Then comes the fun part.

Embellishment. 

I added 3 lengths of twine on the bottom of the dreamcatcher. On the bottom of the twine, I added a couple of beads and then some large black feathers for character.


I added a few more feathers to the dream catcher and even hot glued a tiny dream catcher in the center that we picked up at the South Carolina State Fair two years ago.


Pretty much, add whatever suits your fancy.


Then hang it up on your wall and step back and admire your work! 


I just really like how it looks in the dude's room.


8.24.2012

frosting cupcakes


I needed to make some cupcakes for a friend. I wanted them to look pretty but I didn't have a frosting kit. So, I searched on pinterest until I found this tutorial.


I'm so happy with how they turned out that I don't plan on buying any frosting tips for cupcakes anytime soon. 

Oh my goodness, now I'm in trouble with looking at this photo. They look so delicious that I might have to make some more now. 

6.02.2012

IBC root beer edging

I have this herb garden, see?

It needed some edging, see?


I had these IBC root beer bottles, see?

{I had originally seen an upturned bottle edging in the kitchen garden at the Williamsburg Plantation a couple of summers ago and I loved it! I've been wanting to duplicate it ever since.}

What you do is wash out your bottles that you plan on using. I ran mine through the dishwasher. I got lucky with the fact that IBC root beer bottles have no labels. 

Use a trowel to get the dirt out of where you'll be placing your bottles. Take that dirt and fill your bottles with it. I tried using a funnel at first, but with our clay dirt here where we live in North Carolina it worked best to just use my hand and fingers to get the dirt broken up and stuffed in the bottle. 


Make sure you tamp that dirt in there really well. It will help your bottles to be more sturdy and less likely to be broken. 

When I saw the edging in the kitchen garden at the Williamsburg Plantation the bottle were in the ground a lot more. I would have liked to have my bottles in the ground more but it was difficult.


Put them right smack dab next to each other. 
{Bases of the bottles touching not the necks of the bottles.}


So, naturally, there will be a space in the ground between the necks of the bottles that you will need to fill in.


In the pic on the left I had put in 4 and there are 6 in the one on the right.


And here I've added 4 more for a total of 10. I'm adding a few bottles at a time when I find the time.

I have chives, thyme, spearmint, rosemary, curled parsley, basil, cilantro, & lavender and then at the very end we have a tomato plant that Todd planted from a seed for school. 

5.30.2012

teacher present tutorial

I decided to make one of the pinterest teacher presents for Todd's teachers. It was insanely simple. I picked out pretty flowers from the store that attract butterflies.

I then printed out in a large print "Thank you for helping me to grow this year!" on white card stock and cut it out using cheap scrapbook scissors. I glued it onto a slightly bigger piece of pink card stock using a glue stick. I then taped an old pencil onto the back of the note so that it would stand up in the flower pot.

I wrapped the bottoms of the pots with cling wrap since I couldn't find any bottoms at the store that fit them right. Then wrapped tissue paper around their bases and tied them with a pretty ribbon.

3.09.2012

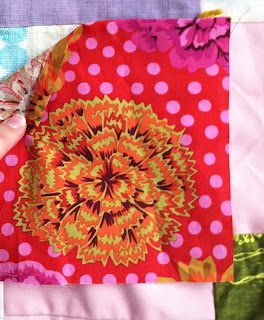
replacing a square quilt block tutorial

I replaced 28 squares on my Mom's quilt and thought I would share how I do it. I feel that a quilt is sentimental and replacing damaged blocks just adds to it by putting more love into it and giving you more memories with it. 


Start with your damaged block and cut out fabric about an inch or so longer on each side.


Fold over the top edge and then run your nail across the edge to make it stay {my version of pressing, hehe, feel free to just press}.


I'm showing you about how long I do my thread. I don't want it too long because then it tangles up too much for me.


Put your needle through your patch right where the edge matches up with the corner of your upper block. Then invisible stitch the edge of your patch to the edge of your upper block.


I try to sew very tiny stitches. It makes it more secure and has a more finished look.


When your thread comes to an end tie a knot {I tie 2 or 3 knots because I have a fear of my hard work coming undone} and tuck the hanging thread under your patch. Then continue to invisible stitch along the edge of your fabric, just tucking the knot under the edge.


When you get to the corner, fold the next edge under, press, & invisible stitch.


And continue through your edges and then tie a knot {or 2 or 3, like me}. Clip your thread short and admire your handiwork!


1.10.2012

Crib Rail Teether Tutorial

Alice just started teething and as much as I love her getting fiber I don't want her to get it from her crib. It only takes a couple of hours to make... depending on how many interruptions you have.

I was originally going to use batting to pad the rail teether but I didn't feel like cutting into my quilting batting. Instead I used some fleece that I had on hand. Now my fleece was not long enough so I had to stitch it together so that it would be long enough. If you have to stitch your batting or fleece together use the zig-zag stitch so that your fabric does not overlap and create a bump:


You can use batting for the inside, but then I would suggest cutting only one strip of batting and cutting a strip of fabric for the backing. This will allow it to stay washable.


You need:
2 strips of fleece 
1 strip of outer fabric
ribbon

Your measurements will probably differ depending on the size of your crib, but my strips measured 53 inches x 6 inches. 
If you would like your rail teether to go farther down your crib side just cut your strips wider. I only wanted to cover the rail so kept the width to 6 inches.


Layer your strips with the fleece {or your batting} on the bottom, outer fabric right side up in the middle, and then fleece {or backing fabric wrong side up} on the top. 
Like so:


If you did patch together 2 pieces of fleece like I did then flip your strips around so the the seams are not on top of each other. I was afraid that if my two seams were on top of each other it would make an uncomfortable bump. 


Stitch around 3 edges leaving one end open:


On the end that you stitched close, clip the edges:


Turn the long strip right side out with your outer fabric on the outside.


Then you will have a lovely long thick strip:


Turn your open unfinished edge in and top stitch it closed. 


It's alright that your seam is on the outside and showing because now your going to top stitch all along the rest.


When you're done you'll have this lovely strip:


Then take it and put in on the crib rail to mark where you want to put your ties. 


I used safety pins to mark the spots where I wanted to sew on the ties. Using safety pins keep you from getting stuck when sewing on the ribbons and keeps your baby's fingers safe while they're playing assistant:


My ribbon ties were 6 - 6 1/2 inches long. I might have made them longer, but that was all I had of that ribbon. 

Fold over your ribbon when you sew it on or it might rip right off when you go to tie it onto your crib {like mine did the first time}:


Sew your ribbon onto the back of your rail teether. If your tie has an obvious top MAKE SURE the top is facing the same direction as your outer fabric:


Looks like a cool caterpillar, right?:


Go ahead and tie on your awesome crib rail teether:


I tied the ribbons with 2 knots each and then finished them off with a bow: